Introduction
In today's era of DIY electronics projects, creating your own Arduino spy bug—a voice recorder capable of discreetly capturing audio—can be an exciting endeavor. With the versatile Arduino Nano microcontroller board and a few additional components, you can build a powerful spy bug that fits in the palm of your hand.
Have you ever seen those spy movies where the protagonist plants a tiny bug in a room to record conversations? Well, now you can do the same thing with your own Arduino spy bug! This project is a great way to learn about Arduino and electronics, and it's also a lot of fun.
In this blog, we will guide you through the process of making your very own Arduino Nano-based spy bug voice recorder, enabling you to explore the world of covert audio surveillance.
Components Required:
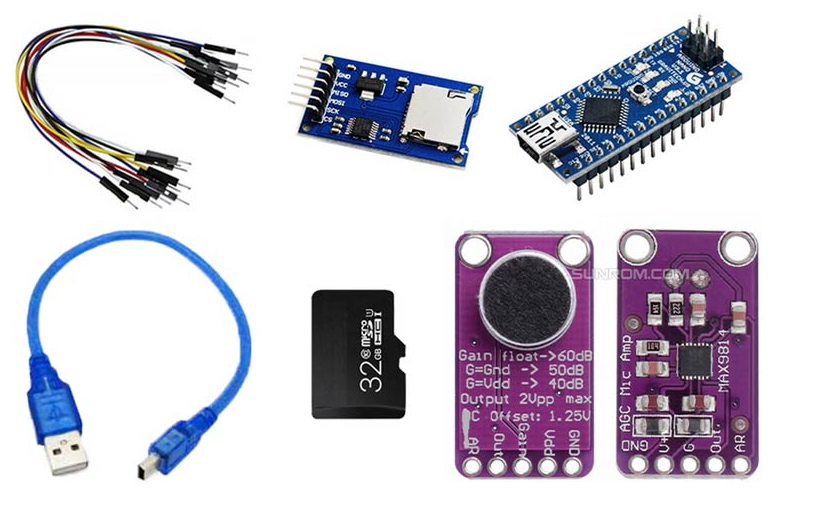
To begin building your Arduino spy bug voice recorder, you will need the following components:
- Arduino Nano
- MAX9814 microphone amplifier
- Micro SD card
- Breadboard
- Jumper wires
- LED
- 220 ohm resistor
- 9V battery
- Arduino Nano: The compact and powerful Arduino Nano will serve as the heart of our spy bug.
- MAX4466 Microphone Amplifier: This amplifier module enhances the sensitivity of the microphone, allowing for better audio capture.
- Micro SD Card Module: Used for storing the recorded audio data, the micro SD card module provides ample storage capacity.
- Breadboard: The breadboard will be used for prototyping and creating temporary connections.
- Jumper Wires: These wires will facilitate the connections between various components.
- LED: An LED can be added to indicate the device's status or provide visual feedback.
- 220 Ohm Resistor: The resistor is used to limit the current flowing through the LED.
- 9V Battery: A 9V battery or suitable power supply is necessary to power the Arduino Nano and other components.
Step-by-Step Guide: Now let's dive into the step-by-step process of constructing your Arduino Nano spy bug voice recorder:
-
Circuit Setup: Begin by connecting the components on the breadboard:
a. Connect the MAX9814 microphone amplifier to the Arduino Nano. The amplifier's output should be connected to one of the Arduino's analog input pins (e.g., A0).
b. Connect the micro SD card module to the Arduino Nano. Utilize the SPI communication interface, connecting the respective pins (MISO, MOSI, SCK, CS) to the Arduino Nano.
c. Add an LED to the circuit for visual feedback, connecting its longer leg (anode) to a digital pin (e.g., D13) on the Arduino Nano, and its shorter leg (cathode) to a 220-ohm resistor. Connect the other end of the resistor to the Arduino's ground (GND).
-
Programming the Arduino Nano: To enable audio recording and storage, we need to program the Arduino Nano:
a. Install the Arduino IDE on your computer and connect the Arduino Nano via a USB cable.
b. Open the Arduino IDE, create a new sketch, and include the necessary libraries for the microphone amplifier and SD card module.
c. Define the required pins and initialize the microphone amplifier and SD card module.
d. Set up the necessary functions to record and save audio data to the SD card. This can involve reading audio samples from the microphone amplifier, converting them into digital format, and storing them on the SD card.
e. Optionally, implement features such as audio triggering based on specific events or adding timestamps to the recorded audio files.
f. Upload the code to the Arduino Nano and disconnect it from the computer.
- a. Remove the Arduino Nano from the breadboard and carefully connect the microphone amplifier, micro SD card module, and LED to the appropriate pins on the Nano.
- b. Arrange the components within a discreet enclosure of your choice, ensuring the microphone is placed optimally for capturing audio without attracting attention.
- c. Connect a 9V battery or suitable power supply to power the Arduino Nano and the spy bug.
Conclusion
Building your own Arduino Nano spy bug voice recorder is an exciting project that allows you to explore the realm of covert audio surveillance. By using the Arduino Nano, along with the MAX9814 microphone amplifier, micro SD card module, and other necessary components, you can create a powerful voice recorder. Remember to use your knowledge and skills responsibly, respecting privacy and legal boundaries. Enjoy experimenting with your Arduino spy bug and unlock the potential for innovative applications or creative projects.